
Congrats to all early Samsung Galaxy S5 owners. For the first time ever XDA developers showed such a quick response to any Samsung Galaxy device. Before Samsung could release their newest flagship device to the market, XDA developers had managed to obtain root permission on Samsung Galaxy S5. Not only ROOT they also successfully ported few fully working Custom Recovery for Galaxy S5. Mentionable among those are ClockworkMOD Normal (CWM), CWM Touch recovery for Galaxy S5, TeamWIN, TWRP Touch recovery and Philz Touch recovery for Galaxy S5. One by one we’ll post about all those recovery for Galaxy S5 so stay tuned with our blog.
Today we’re going to discuss a bit about Philz recovery. And show you How to Install Touch recovery on Galaxy S5. This recovery has been tested with all Galaxy S5 variants (Verizon, Sprint, T-Mobile, AT&T, Vodafone) (SM-G900V, G900P, G900W8, G900F, G900M, G900T, G900I, G900K/L/S, G900A). So you can install this recovery on above mentioned models without keeping any doubt in mind.
What is Touch/Custom Recovery in Android Phones
Now that you have proceeded to Install Touch recovery on Galaxy S5, you must know what is a Touch/Custom Recovery, How does recovery works and What are the benefits of Installing a Recovery on Android device. I will not go into details. A Custom Recovery is nothing but a replacement of Stock recovery. It is tweaked to do more tasks.
Every Android device comes with a recovery mode. That is called stock recovery. Now the stock recovery isn’t build in such way that it could install signed archive. It only helps to backup and restore stock ROM. This is very basic work. But with Custom Recovery you could do many things, like install Custom ROM, install Custom Theme, make advance backup/restore, partitioning SD card, wipe date/cache and lots more. In few words, Custom Recovery is must have for Galaxy S5. So without wasting anymore times lets check How to Install Touch recovery on Galaxy S5 and make it works.
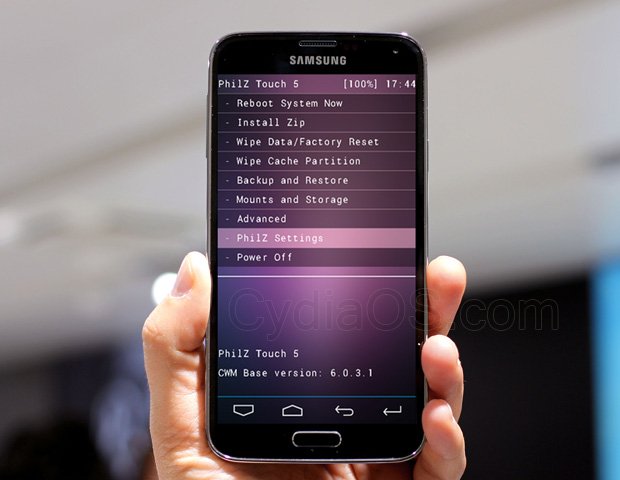
Just in case you don’t know, Philz Touch recovery is actually (90%) based on ClockworkMOD recovery which is tweaked with light purple shade to make it looks like Ubuntu device.
Install Touch Recovery on Samsung Galaxy S5
First thing first, you need to Install Galaxy S5 drivers on your PC before you could proceed with Touch Recovery installation. If you already have this driver installed, you can skip this step.
1) Install Samsung Galaxy S5 USB drivers (Windows/Mac)
Without proper USB driver your smartphone won’t be able to communicate with your PC/MAC which will lead to unsuccessful Recovery installation. So before your proceed download and install Galaxy S5 USB driver (Windows). If you own a Mac try installing Samsung Kies for Mac instead, as there is no third party USB software available for MAC.
2) Enable USB Debugging on Galaxy S5
USB debugging mode is very essential for connecting Galaxy S5 to PC, without debug mode you won’t be able to send any command from PC to Android. As Galaxy S5 runs on Android KitKat you need to go through two steps process to Enable USB Debugging. Follow this guide, then come back to complete Galaxy S5 Touch recovery installation.
3) Download/Install Galaxy S5 touch recovery and ODIN flasher
ODIN_V3.09 Download Link – Recovery Download Link
- Unzip the downloaded zip files into a folder.
- Make sure your device is not connected to computer.
- Turn off Galaxy S5 completely, then boot into S5 download mode by pressing Power button + Home button + Volume down.
- Now open the extracted folder and RUN ODIN
- From ODIN window, tick the box beside AP button then press the AP button and select the Philz recovery.
- Ensure only Auto Reboot and F.Reset time are ticked from ODIN Option panel.
- Connect device to computer, when “ADDED” message appears in Odin, press “Start” button to start the installation.
- Once the installation is done, your device will reboot automatically.
If somehow it stuck at boot screen, don’t panic just power off the device and reboot into recovery mode by holding down volume buttons along with power button. There select wipe data/factory reset to perform wipe. Once it’s done, go back and select “Reboot System Now” to reboot the device. This time it should boot normally.
That’s it, you have successfully completed all steps to Install Touch Recovery on Galaxy S5. If you like this guide please share it and leave a +ive feedback in below comment section. Having any problem, let us know in below comment, we’ll sort it out together. Good Luck with Galaxy S5 Touch Recovery Installation.


")


Estan caidos los link de descarga
this does not work in marshmallow 6.0.1
Can you help me in this problem…
Added!!
Removed!!
Added!!
Enter CS for MD5..
Check MD5.. Do not unplug the cable..
Please wait..
philz_touch_6.26.6-klte.tar.md5 is valid.
Checking MD5 finished Sucessfully..
Leave CS..
Odin v.3 engine (ID:4)..
File analysis..
SetupConnection..
Initialzation..
Get PIT for mapping..
Firmware update start..
SingleDownload.
recovery.img
NAND Write Start!!
FAIL! (Auth)
Complete(Write) operation failed.
All threads completed. (succeed 0 / failed 1)
i need Philz Touch 6.27.6-k3gxx.tar file any one help me
more info here
I have a rooted stock galaxy s5 sm-g900v running 5.0. I was running 4.4.4 and used Safestrap to get to lollipop. Now I have no access to Safestrap but it is still installed. My question is does phillz touch recovery work on lollipop and is it safe to install over Safestrap as I would love to try some of the other awesome roms that are available?
I am running a rooted stock verizon s5 sm-g900v 5.0 OA8. Safestrap is still installed, I just can’t access it. will this interfere with flashing new touch recovery? Would really like to try some of the custom roms out Safely, and I’m just not ready to try flashfire yet. Would appreciate any comments
I have a rooted stock samsung galaxy s5 sm-g900v 5.0. It still has safestrap twrp installed but I can’t access it. Is this going to interfere with installing new recovery. Really don’t want to brick my phone and am just not ready to try flashfire yet. Would appreciate any coments. Would love to try some different custom roms safely.
Ive installed it but whenever i go into recovery mode it still shows the default recovery menu
Same here an anwser please
I got this message in Odin, when done your list of things, and when added, and pressed start, this happens;
Enter CS for MD5..
Check MD5.. Do not unplug the cable..
Please wait..
philz_touch_6.26.6-klte.tar.md5 is valid.
Checking MD5 finished Sucessfully..
Leave CS..
Added!!
Odin v.3 engine (ID:4)..
File analysis..
SetupConnection..
Initialzation..
Get PIT for mapping..
Firmware update start..
SingleDownload.
recovery.img
NAND Write Start!!
FAIL! (Auth)
Complete(Write) operation failed.
All threads completed. (succeed 0 / failed 1)
– so I humbly ask for your help so I can do it right, please??
Hi. I think you should retry flashing the recovery file by using a different USB port on your computer and/or a different USB cable. I’ve been down that road before. Make sure the phone is in download mode and that a number (e.g. com:15) appears in Odin indicating that the pc USB port recognizes the phone.
Good luck on that!
Pls help me i keep getting error Nand write failed.
Hi, did you manage to fix this error? I’m getting the same when trying to flash bootloader/modem BNL9
I have an att gs5 and it keeps getting stuck at the point when it says that it is downloading and to not turn off the target. it never works every time I reboot the phone and try again. What is going on?